<?xml version="1.0" encoding="utf-8"?><feed xmlns="http://www.w3.org/2005/Atom" ><generator uri="https://jekyllrb.com/" version="3.10.0">Jekyll</generator><link href="https://adee-weller.com/feed.xml" rel="self" type="application/atom+xml" /><link href="https://adee-weller.com/" rel="alternate" type="text/html" /><updated>2026-05-04T18:27:29+00:00</updated><id>https://adee-weller.com/feed.xml</id><title type="html">Adee Weller</title><subtitle>I am a Ph.D. candidate in Political Science at Emory University. I study how armed groups intersect with and shape politics.</subtitle><author><name>Adee Weller</name></author><entry><title type="html">The Impact of Mayoral Re-election on Violence and Collusion in Mexico</title><link href="https://adee-weller.com/_pages.home.md" rel="alternate" type="text/html" title="The Impact of Mayoral Re-election on Violence and Collusion in Mexico" /><published>2025-10-22T00:00:00+00:00</published><updated>2025-10-22T00:00:00+00:00</updated><id>https://adee-weller.com/reelection</id><content type="html" xml:base="https://adee-weller.com/_pages.home.md"><![CDATA[<h1 id="the-key-takeways">The Key Takeways</h1>

<p>Being able to re-elect (or reject) an incumbent is a critical aspect of democratic accountability. Voters can hold elected officials accountable for their actions, and officials, in turn, govern better or more in line with what voters want in order to win re-election. But wanting to continue holding office can also drive officials to work with powerful groups, embezzle campaign funds, and use their official authority to keep their position. It can also incentivize armed groups, like criminal organizations, to use violence and coercion to keep key allies in power. What happens when mayors, particularly in areas where criminal organizations are powerful, gain the ability to run for re-election?</p>

<p>This is what happened in Mexico in 2018, where mayors in some states where permitted to run for re-election ahead of mayors in other states. The same year, Mexico experienced a record level of violence against local politicians, only to be surpassed again in 2021, with hundreds of mayoral candidates murdered, abducted, or threatened by organized crime. Criminal-electoral violence like this, as well as collusion between elected officials and criminal groups, present key challenges to democracies across Latin America. Despite this, we understand little about how political incentives shape the behavior of organized criminal groups.</p>

<p>In my forthcoming article at the <em>British Journal of Political Science,</em> titled “Defending the Status Quo? How Re-election Shapes Criminal Collusion in Mexico,” I examine how the introduction of mayoral re-election affects electoral violence and local collusion between mayors and criminal organizations in Mexico. I compare municipalities where mayors were eligible for re-election to those where they were not using a staggered difference-in-differences design. My findings suggest that in places where criminal groups already influence local politics, re-election caused increases in killings of candidates who rivaled the sitting mayor, and caused an increase in collusion following the election. This is driven by efforts of criminal groups to keep key allies in power, providing continued protection and resources from state channels. You can read the full <a href="https://www.dropbox.com/scl/fi/gjo3u1usl0e02moah25dz/BJPolS_Final.pdf?rlkey=haxge7aps37e0boywd0f0o8ve&amp;st=it588g6f&amp;dl=0">paper</a> and <a href="https://www.dropbox.com/scl/fi/gpjqkk0rusqy3xhwhogou/BJPolS_Final_SI.pdf?rlkey=e3s1t8o154b6aihnlp6pykit4&amp;st=mthlcmcs&amp;dl=0">appendix</a> here.</p>

<h1 id="what-was-the-reform">What was the Reform?</h1>

<p>In 2014, Mexico implemented a reform that permitted state legislatures to allow mayors to run for immediate re-election. This change aimed to reduce corruption, improve governance, and promote local accountability, while also maintaining local party power. However, it also created an environment where some mayors—especially those in areas where armed, criminal groups are powerful—may feel pressured to make deals with criminal organizations to secure their legacies and stay in office.</p>

<p>Following state legislative calendars, states began to approve mayoral re-election in 2015, 2016, and 2017, effective for the nationally coordinated elections in June of 2018. Here’s a map of these approvals:</p>

<p><img src="https://adee-weller.com/assets/images/approval.jpg" alt="image-center" title="Mayoral Re-election Approval" class="align-center" /></p>

<p>To learn more about the reform, check out <a href="https://www-cambridge-org/core/books/unity-through-particularism/D375BDA7570E460357FCC27E78C5F9C6?utm_campaign=shareaholic&amp;utm_medium=copy_link&amp;utm_source=bookmark">Motolinia (2025)</a>. In some states, mayors could only serve consecutively twice, while in others, they could hold office up to four terms (twelve years in total).</p>

<h1 id="how-did-the-reform-affect-electoral-violence-and-local-collusion">How did the Reform Affect Electoral Violence and Local Collusion?</h1>

<p>I compare how the introduction of mayoral re-election changed two outcomes: first, how organized criminal groups used violence to shape electoral outcomes, and second, how mayors and criminal groups colluded following elections, using original data on violence, municipal audits, and national surveys from 2012 to 2022.</p>

<p>The results show that, when mayors can run for re-election in places where criminal groups are powerful and entrenched in local illicit economies, they are also significantly more likely to kill candidates that challenge the incumbent mayor. Using a conservative proxy for criminal entrenchment in local politics (presence of poppy fields), I show that organized criminal groups use electoral violence to ensure that their preferred candidate gets into and stays in office, allowing continued benefits of co-opted governance. Here’s a visualization of the effects of the reform by victim:</p>

<p><img src="https://adee-weller.com/assets/images/CSA_attge_poppies.jpg" alt="image-center" title="Effects of Re-election on Electoral Violence" class="align-center" /></p>

<p>When mayors can run for re-election in areas where organized crime already shapes politics, these municipalities are 79% more likely to be selected for budgetary audits by <em>La Auditorıa Superior de la Federacion</em> (ASF), an independent auditing body that selects municipalities based on their likelihood of corruption and mis-spending. These audits also reveal an average 74.7% increase in improperly allocated municipal spending, suggestive of corrupt practices.</p>

<p>Localized survey evidence from <em>Instituto Nacional de Estadística y Geografía</em> (INEGI) also shows that in these high-crime areas, mayoral re-election causes increased perceptions of police corruption, while electricity and water provision remain consistent. Further, criminal groups are more stable and cohesive in these areas, benefiting from protection and resources by local mayors.</p>

<h1 id="is-re-election-good-for-democracy-how-can-we-better-protect-officials-candidates-and-voters">Is Re-election Good for Democracy? How can we better protect officials, candidates, and voters?</h1>

<p>The short answer is yes. Re-election is core function of democracy, where voters can have their voices heard and hold elected officials accountable. But the guardrails that protect these mechanisms must reflect the local challenges and dynamics that threaten these democratic pillars.</p>

<p>In high-crime areas, where criminal organizations co-opt and capture state actors and functions, institutional reforms like re-election can also be captured and distorted for illicit gain, thereby undermining the positive effects of democratic rule. This poses a key challenge for democracies that face problems of organized crime: state governance can become a vessel for criminal governance, where spending, police power, and state authority are directed away from helping communities and instead to growing illicit networks.</p>

<p>In these settings, reforms should come with guardrails that consider and account for these risks appropriately, like providing increased protection for candidates running for office and federal attention to dismantling recruitment networks, illicit profit flows, and trafficking routes that propel criminal actors. Other measures also include strengthening and coordinating oversight, transparent audits, and non-partisan investigations to prevent collusion from taking root.</p>

<p>More broadly, this also suggests that academics should consider criminal groups as powerful political actors, particularly in settings such as Mexico, Brazil, and Ecuador. While they may not boast clear partisan ideologies or allegiances, they fundamentally shape who gets into office and how they govern. By expanding our conceptualization of which groups are inherently political, we can better generate knowledge about their impacts on governance and better inform policy to protect human security and dignity.</p>]]></content><author><name>Adee Weller</name></author><category term="Public Scholarship" /><category term="Blogging" /><category term="Mexico" /><category term="Re-election" /><category term="Criminal Violence" /><category term="Electoral Violence" /><category term="Mayors" /><category term="Difference-in-Differences" /><summary type="html"><![CDATA[The Key Takeways Being able to re-elect (or reject) an incumbent is a critical aspect of democratic accountability. Voters can hold elected officials accountable for their actions, and officials, in turn, govern better or more in line with what voters want in order to win re-election. But wanting to continue holding office can also drive officials to work with powerful groups, embezzle campaign funds, and use their official authority to keep their position. It can also incentivize armed groups, like criminal organizations, to use violence and coercion to keep key allies in power. What happens when mayors, particularly in areas where criminal organizations are powerful, gain the ability to run for re-election? This is what happened in Mexico in 2018, where mayors in some states where permitted to run for re-election ahead of mayors in other states. The same year, Mexico experienced a record level of violence against local politicians, only to be surpassed again in 2021, with hundreds of mayoral candidates murdered, abducted, or threatened by organized crime. Criminal-electoral violence like this, as well as collusion between elected officials and criminal groups, present key challenges to democracies across Latin America. Despite this, we understand little about how political incentives shape the behavior of organized criminal groups. In my forthcoming article at the British Journal of Political Science, titled “Defending the Status Quo? How Re-election Shapes Criminal Collusion in Mexico,” I examine how the introduction of mayoral re-election affects electoral violence and local collusion between mayors and criminal organizations in Mexico. I compare municipalities where mayors were eligible for re-election to those where they were not using a staggered difference-in-differences design. My findings suggest that in places where criminal groups already influence local politics, re-election caused increases in killings of candidates who rivaled the sitting mayor, and caused an increase in collusion following the election. This is driven by efforts of criminal groups to keep key allies in power, providing continued protection and resources from state channels. You can read the full paper and appendix here. What was the Reform? In 2014, Mexico implemented a reform that permitted state legislatures to allow mayors to run for immediate re-election. This change aimed to reduce corruption, improve governance, and promote local accountability, while also maintaining local party power. However, it also created an environment where some mayors—especially those in areas where armed, criminal groups are powerful—may feel pressured to make deals with criminal organizations to secure their legacies and stay in office. Following state legislative calendars, states began to approve mayoral re-election in 2015, 2016, and 2017, effective for the nationally coordinated elections in June of 2018. Here’s a map of these approvals: To learn more about the reform, check out Motolinia (2025). In some states, mayors could only serve consecutively twice, while in others, they could hold office up to four terms (twelve years in total). How did the Reform Affect Electoral Violence and Local Collusion? I compare how the introduction of mayoral re-election changed two outcomes: first, how organized criminal groups used violence to shape electoral outcomes, and second, how mayors and criminal groups colluded following elections, using original data on violence, municipal audits, and national surveys from 2012 to 2022. The results show that, when mayors can run for re-election in places where criminal groups are powerful and entrenched in local illicit economies, they are also significantly more likely to kill candidates that challenge the incumbent mayor. Using a conservative proxy for criminal entrenchment in local politics (presence of poppy fields), I show that organized criminal groups use electoral violence to ensure that their preferred candidate gets into and stays in office, allowing continued benefits of co-opted governance. Here’s a visualization of the effects of the reform by victim: When mayors can run for re-election in areas where organized crime already shapes politics, these municipalities are 79% more likely to be selected for budgetary audits by La Auditorıa Superior de la Federacion (ASF), an independent auditing body that selects municipalities based on their likelihood of corruption and mis-spending. These audits also reveal an average 74.7% increase in improperly allocated municipal spending, suggestive of corrupt practices. Localized survey evidence from Instituto Nacional de Estadística y Geografía (INEGI) also shows that in these high-crime areas, mayoral re-election causes increased perceptions of police corruption, while electricity and water provision remain consistent. Further, criminal groups are more stable and cohesive in these areas, benefiting from protection and resources by local mayors. Is Re-election Good for Democracy? How can we better protect officials, candidates, and voters? The short answer is yes. Re-election is core function of democracy, where voters can have their voices heard and hold elected officials accountable. But the guardrails that protect these mechanisms must reflect the local challenges and dynamics that threaten these democratic pillars. In high-crime areas, where criminal organizations co-opt and capture state actors and functions, institutional reforms like re-election can also be captured and distorted for illicit gain, thereby undermining the positive effects of democratic rule. This poses a key challenge for democracies that face problems of organized crime: state governance can become a vessel for criminal governance, where spending, police power, and state authority are directed away from helping communities and instead to growing illicit networks. In these settings, reforms should come with guardrails that consider and account for these risks appropriately, like providing increased protection for candidates running for office and federal attention to dismantling recruitment networks, illicit profit flows, and trafficking routes that propel criminal actors. Other measures also include strengthening and coordinating oversight, transparent audits, and non-partisan investigations to prevent collusion from taking root. More broadly, this also suggests that academics should consider criminal groups as powerful political actors, particularly in settings such as Mexico, Brazil, and Ecuador. While they may not boast clear partisan ideologies or allegiances, they fundamentally shape who gets into office and how they govern. By expanding our conceptualization of which groups are inherently political, we can better generate knowledge about their impacts on governance and better inform policy to protect human security and dignity.]]></summary></entry><entry><title type="html">What are Git and GitHub, and How Do I Set Them Up?</title><link href="https://adee-weller.com/_pages.home.md" rel="alternate" type="text/html" title="What are Git and GitHub, and How Do I Set Them Up?" /><published>2025-03-14T00:00:00+00:00</published><updated>2025-03-14T00:00:00+00:00</updated><id>https://adee-weller.com/git-github</id><content type="html" xml:base="https://adee-weller.com/_pages.home.md"><![CDATA[<h2 id="what-is-git">What is Git?</h2>

<p>Git is a free, open-source version control system that helps developers track changes to their code. It’s the most widely used version control system in the world. Every coder has their own codebase and can work on it at any time. You can create branches, merge them, and delete (and undelete!) them with ease, making it very easy to track changes and revert to older versions of the code.</p>

<p>It is particularly popular with software developers and collaborative teams. It is not yet widely popular with political scientists (who are often hesitant about coding), but it <strong>should be</strong>—and is becoming more popular!</p>

<p>Git is open-source and free.</p>

<p>Git comes with a terminal called <strong>GitBash</strong>.</p>

<hr />

<h2 id="what-is-github">What is GitHub?</h2>

<p>GitHub is a cloud-based hosting service and website that helps software developers store, track, and collaborate on projects. It’s often described as a “social network for programmers” that encourages collaboration and sharing.</p>

<p>It uses Git to move files and track changes while multiple people work on the same project simultaneously.</p>

<p>Developers use GitHub to showcase their code and work ethic through their profiles.</p>

<h3 id="getting-started-with-github">Getting Started with GitHub</h3>
<ol>
  <li>Go to <a href="https://github.com/">GitHub</a> and explore the interface.</li>
  <li>Click on a profile, navigate projects, and familiarize yourself with the site.</li>
  <li>Visit Adee’s <strong>R Workshop</strong> page—this will be our focus.</li>
</ol>

<hr />

<h2 id="opening-git">Opening Git</h2>

<p>Think of a <strong>repository</strong> (<em>repo</em>) as a folder where all your code and data are stored. You can share this folder and edit it as needed.</p>

<p>There are two types of repositories:</p>
<ol>
  <li>A local repo (on your device).</li>
  <li>A cloud repo (on GitHub).</li>
</ol>

<h3 id="opening-gitbash-pc-or-terminal-mac">Opening GitBash (PC) or Terminal (Mac)</h3>
<p>For Windows:</p>
<ul>
  <li>Type <code class="language-plaintext highlighter-rouge">bash</code> into the search bar and hit Enter.</li>
</ul>

<p>For Mac:</p>
<ul>
  <li>Open <strong>Terminal</strong> (or any preferred shell).</li>
</ul>

<hr />

<h2 id="configuring-git">Configuring Git</h2>

<p>Before using Git, set your user information:</p>

<div class="language-bash highlighter-rouge"><div class="highlight"><pre class="highlight"><code>git config <span class="nt">--global</span> user.name <span class="s2">"Adee Weller"</span>
git config <span class="nt">--global</span> user.email <span class="s2">"adee.weller@emory.edu"</span>
git config <span class="nt">--global</span> init.defaultBranch main
</code></pre></div></div>

<p>This ensures all commits are associated with your identity and sets <code class="language-plaintext highlighter-rouge">main</code> as the default branch.</p>

<p><strong>Helpful Commands:</strong></p>
<ul>
  <li>Get help for a command:
    <div class="language-bash highlighter-rouge"><div class="highlight"><pre class="highlight"><code>git &lt;<span class="nb">command</span><span class="o">&gt;</span> <span class="nt">-h</span>
</code></pre></div>    </div>
  </li>
  <li>Clear the terminal:
    <div class="language-bash highlighter-rouge"><div class="highlight"><pre class="highlight"><code>clear
</code></pre></div>    </div>
  </li>
</ul>

<hr />

<h2 id="creating-a-local-git-repository">Creating a Local Git Repository</h2>

<h3 id="move-to-your-working-directory">Move to Your Working Directory</h3>
<div class="language-bash highlighter-rouge"><div class="highlight"><pre class="highlight"><code><span class="nb">cd </span>path/to/directory
</code></pre></div></div>

<p>If the folder doesn’t exist, create one:</p>
<div class="language-bash highlighter-rouge"><div class="highlight"><pre class="highlight"><code><span class="nb">mkdir </span>foldername
</code></pre></div></div>

<h3 id="initialize-git-repo">Initialize Git Repo</h3>
<div class="language-bash highlighter-rouge"><div class="highlight"><pre class="highlight"><code>git init
</code></pre></div></div>

<p>Check if it worked:</p>
<div class="language-bash highlighter-rouge"><div class="highlight"><pre class="highlight"><code>git status
</code></pre></div></div>

<hr />

<h2 id="adding-files-to-git">Adding Files to Git</h2>

<p>Create a blank file:</p>
<div class="language-bash highlighter-rouge"><div class="highlight"><pre class="highlight"><code><span class="nb">touch </span>newfile_AW.txt
</code></pre></div></div>
<p><em>(Replace “AW” with your initials.)</em></p>

<p>Verify the file exists:</p>
<div class="language-bash highlighter-rouge"><div class="highlight"><pre class="highlight"><code><span class="nb">ls</span>
</code></pre></div></div>

<p>Rename the file if needed:</p>
<div class="language-bash highlighter-rouge"><div class="highlight"><pre class="highlight"><code>git <span class="nb">mv</span> <span class="s2">"Old_name"</span> <span class="s2">"New_name"</span>
</code></pre></div></div>

<h3 id="staging-files-for-commit">Staging Files for Commit</h3>
<p>Think of staging like preparing files before pushing them live.</p>

<p>Add a file to the staging area:</p>
<div class="language-bash highlighter-rouge"><div class="highlight"><pre class="highlight"><code>git add newfile_AW.txt
</code></pre></div></div>

<p>To track all files:</p>
<div class="language-bash highlighter-rouge"><div class="highlight"><pre class="highlight"><code>git add <span class="nb">.</span>
</code></pre></div></div>

<p>To unstage a file:</p>
<div class="language-bash highlighter-rouge"><div class="highlight"><pre class="highlight"><code>git <span class="nb">rm</span> <span class="nt">--cached</span> &lt;filename&gt;
</code></pre></div></div>

<p>To prevent Git from tracking specific files (e.g., sensitive data), create a <code class="language-plaintext highlighter-rouge">.gitignore</code> file.</p>

<hr />

<h2 id="committing-changes">Committing Changes</h2>

<p>A commit records a snapshot of the repository.</p>

<div class="language-bash highlighter-rouge"><div class="highlight"><pre class="highlight"><code>git commit <span class="nt">-m</span> <span class="s2">"Added new file"</span>
</code></pre></div></div>

<p>Check commit history:</p>
<div class="language-bash highlighter-rouge"><div class="highlight"><pre class="highlight"><code>git log <span class="nt">--oneline</span>
</code></pre></div></div>

<p>To undo a commit:</p>
<div class="language-bash highlighter-rouge"><div class="highlight"><pre class="highlight"><code>git reset <span class="c">######  # Replace ###### with the commit ID</span>
</code></pre></div></div>

<hr />

<h2 id="branching-in-git">Branching in Git</h2>

<p>Branches allow you to work on different versions of a project.</p>

<p>Create a new branch:</p>
<div class="language-bash highlighter-rouge"><div class="highlight"><pre class="highlight"><code>git branch my-branch
</code></pre></div></div>

<p>List branches:</p>
<div class="language-bash highlighter-rouge"><div class="highlight"><pre class="highlight"><code>git branch
</code></pre></div></div>

<p>Switch to a branch:</p>
<div class="language-bash highlighter-rouge"><div class="highlight"><pre class="highlight"><code>git switch my-branch
</code></pre></div></div>

<p>Commit changes to the branch:</p>
<div class="language-bash highlighter-rouge"><div class="highlight"><pre class="highlight"><code>git add <span class="nb">.</span>
git commit <span class="nt">-m</span> <span class="s2">"Changes in new branch"</span>
</code></pre></div></div>

<p>Merge the branch back to <code class="language-plaintext highlighter-rouge">main</code>:</p>
<div class="language-bash highlighter-rouge"><div class="highlight"><pre class="highlight"><code>git merge my-branch
</code></pre></div></div>

<p>Delete the branch:</p>
<div class="language-bash highlighter-rouge"><div class="highlight"><pre class="highlight"><code>git branch <span class="nt">-d</span> my-branch
</code></pre></div></div>

<hr />

<h2 id="pushing-code-to-github">Pushing Code to GitHub</h2>

<h3 id="creating-a-github-repository">Creating a GitHub Repository</h3>
<ol>
  <li>Go to <a href="https://github.com/">GitHub</a>.</li>
  <li>Click “New” and create a repository.</li>
</ol>

<h3 id="linking-local-repo-to-github">Linking Local Repo to GitHub</h3>
<div class="language-bash highlighter-rouge"><div class="highlight"><pre class="highlight"><code>git remote add origin &lt;repository-URL&gt;
git branch <span class="nt">-M</span> main
git push <span class="nt">-u</span> origin main
</code></pre></div></div>

<p>To push all branches:</p>
<div class="language-bash highlighter-rouge"><div class="highlight"><pre class="highlight"><code>git push <span class="nt">--all</span>
</code></pre></div></div>

<p>To pull new changes:</p>
<div class="language-bash highlighter-rouge"><div class="highlight"><pre class="highlight"><code>git pull
</code></pre></div></div>

<hr />

<h2 id="cloning-an-existing-repo">Cloning an Existing Repo</h2>

<p>To work on a project from GitHub, clone it:</p>

<div class="language-bash highlighter-rouge"><div class="highlight"><pre class="highlight"><code>git clone https://github.com/adeeweller/R_Workshop.git
</code></pre></div></div>

<p>Navigate into the cloned repo:</p>
<div class="language-bash highlighter-rouge"><div class="highlight"><pre class="highlight"><code><span class="nb">cd </span>R_Workshop
</code></pre></div></div>

<p>Check which remote is set:</p>
<div class="language-bash highlighter-rouge"><div class="highlight"><pre class="highlight"><code>git remote <span class="nt">-v</span>
</code></pre></div></div>

<p>Update remote URL if needed:</p>
<div class="language-bash highlighter-rouge"><div class="highlight"><pre class="highlight"><code>git remote set-url origin &lt;new-link&gt;
</code></pre></div></div>

<p>Pull with rebase to apply local changes:</p>
<div class="language-bash highlighter-rouge"><div class="highlight"><pre class="highlight"><code>git pull <span class="nt">--rebase</span> origin main
</code></pre></div></div>

<hr />

<h2 id="final-notes">Final Notes</h2>

<p>Git and GitHub are essential tools for version control and collaboration. While political scientists are still catching on, these tools are becoming more popular in the field.</p>

<p>By mastering Git, you gain:</p>

<p>✅ Better organization.<br />
✅ Version control safety.<br />
✅ Seamless collaboration.</p>

<p>Happy coding! 🚀</p>]]></content><author><name>Adee Weller</name></author><category term="Tutorial" /><category term="Workshop" /><category term="Git" /><category term="GitHub" /><category term="Version Control" /><category term="R" /><summary type="html"><![CDATA[What is Git? Git is a free, open-source version control system that helps developers track changes to their code. It’s the most widely used version control system in the world. Every coder has their own codebase and can work on it at any time. You can create branches, merge them, and delete (and undelete!) them with ease, making it very easy to track changes and revert to older versions of the code. It is particularly popular with software developers and collaborative teams. It is not yet widely popular with political scientists (who are often hesitant about coding), but it should be—and is becoming more popular! Git is open-source and free. Git comes with a terminal called GitBash. What is GitHub? GitHub is a cloud-based hosting service and website that helps software developers store, track, and collaborate on projects. It’s often described as a “social network for programmers” that encourages collaboration and sharing. It uses Git to move files and track changes while multiple people work on the same project simultaneously. Developers use GitHub to showcase their code and work ethic through their profiles. Getting Started with GitHub Go to GitHub and explore the interface. Click on a profile, navigate projects, and familiarize yourself with the site. Visit Adee’s R Workshop page—this will be our focus. Opening Git Think of a repository (repo) as a folder where all your code and data are stored. You can share this folder and edit it as needed. There are two types of repositories: A local repo (on your device). A cloud repo (on GitHub). Opening GitBash (PC) or Terminal (Mac) For Windows: Type bash into the search bar and hit Enter. For Mac: Open Terminal (or any preferred shell). Configuring Git Before using Git, set your user information: git config --global user.name "Adee Weller" git config --global user.email "adee.weller@emory.edu" git config --global init.defaultBranch main This ensures all commits are associated with your identity and sets main as the default branch. Helpful Commands: Get help for a command: git &lt;command&gt; -h Clear the terminal: clear Creating a Local Git Repository Move to Your Working Directory cd path/to/directory If the folder doesn’t exist, create one: mkdir foldername Initialize Git Repo git init Check if it worked: git status Adding Files to Git Create a blank file: touch newfile_AW.txt (Replace “AW” with your initials.) Verify the file exists: ls Rename the file if needed: git mv "Old_name" "New_name" Staging Files for Commit Think of staging like preparing files before pushing them live. Add a file to the staging area: git add newfile_AW.txt To track all files: git add . To unstage a file: git rm --cached &lt;filename&gt; To prevent Git from tracking specific files (e.g., sensitive data), create a .gitignore file. Committing Changes A commit records a snapshot of the repository. git commit -m "Added new file" Check commit history: git log --oneline To undo a commit: git reset ###### # Replace ###### with the commit ID Branching in Git Branches allow you to work on different versions of a project. Create a new branch: git branch my-branch List branches: git branch Switch to a branch: git switch my-branch Commit changes to the branch: git add . git commit -m "Changes in new branch" Merge the branch back to main: git merge my-branch Delete the branch: git branch -d my-branch Pushing Code to GitHub Creating a GitHub Repository Go to GitHub. Click “New” and create a repository. Linking Local Repo to GitHub git remote add origin &lt;repository-URL&gt; git branch -M main git push -u origin main To push all branches: git push --all To pull new changes: git pull Cloning an Existing Repo To work on a project from GitHub, clone it: git clone https://github.com/adeeweller/R_Workshop.git Navigate into the cloned repo: cd R_Workshop Check which remote is set: git remote -v Update remote URL if needed: git remote set-url origin &lt;new-link&gt; Pull with rebase to apply local changes: git pull --rebase origin main Final Notes Git and GitHub are essential tools for version control and collaboration. While political scientists are still catching on, these tools are becoming more popular in the field. By mastering Git, you gain: ✅ Better organization. ✅ Version control safety. ✅ Seamless collaboration. Happy coding! 🚀]]></summary></entry><entry><title type="html">Setting Up Sublime Text with LaTeX</title><link href="https://adee-weller.com/_pages.home.md" rel="alternate" type="text/html" title="Setting Up Sublime Text with LaTeX" /><published>2024-08-21T00:00:00+00:00</published><updated>2024-08-21T00:00:00+00:00</updated><id>https://adee-weller.com/latex-setup</id><content type="html" xml:base="https://adee-weller.com/_pages.home.md"><![CDATA[<h2 id="introduction">Introduction</h2>

<p>In this series, we will be walking through how to set up Sublime Text Editor – a fast, flexible, and user-friendly text editor – for a variety of different programming languages and softwares. (For a more in-depth discussion on the value and pitfalls of Sublime, check out my previous post on Sublime and R.)</p>

<p>In this post, I will work through how to get Sublime set up to write in LaTeX, a typesetting software that is used by publishers and professionals alike. Easily customizable, LaTeX is often far preferred over processors like Microsoft Word in academia. It makes documents, posters, presentations, and other formats clean, clear, and professional.</p>

<p>For this tutorial, I am going to assume you already have Sublime downloaded and set up on your computer. If you haven’t done that yet, do it! Or at least, stop reading here, and go do something fun while there’s still time.</p>

<h2 id="what-is-latex-and-why-is-it-useful">What is LaTeX and why is it useful?</h2>

<p>LaTeX (pronounced <em>lay-tek</em> by some and <em>lah-tek</em> by others) is a software system used to typeset documents. Unlike programs like Word, which pre-define formats and layout of documents, LaTeX is a more flexible and customizable option. Unfortunately, this also means there is a bit more of a learning curve than a simple point-and-click system, as more options need to be defined <em>ex ante</em>. However, this program is quite simple and usually intuitive once mastered, and will soon Word feel clunky and restrictive.</p>

<p>Widely used in academia, becoming comfortable with LaTeX is a critical skill for many junior scholars. With it, one can produce beautiful tables, figures, articles, presentations, posters, C.V.s, resumes, books, cover letters, and a whole range of other documents. LaTeX is also highly functional in multilingual environments and non-Latin scripts, typesetting complex mathematical equations, and adding extensive tables.</p>

<p>To produce a LaTeX product, we will edit an input, through which the software will produce an output (usually a PDF) upon each build. This is in contrast with Mircosoft Word, where both of these are displayed to the user as one joint product. We won’t be covering how to format things in LaTeX here (check out <a href="https://www.overleaf.com/learn/latex/Learn_LaTeX_in_30_minutes">one of many online tutorials here</a>), but we will get everything set up.</p>

<h2 id="setting-up-latex-with-sublime">Setting up LaTeX with Sublime</h2>

<h3 id="downloading-software">Downloading Software</h3>

<p>Let’s start by downloading three pieces of software:</p>

<ul>
  <li>
    <p><a href="https://miktex.org/download">MiKTeX</a>: Open-source TeX distribution</p>
  </li>
  <li>
    <p><a href="https://www.sumatrapdfreader.org/download-free-pdf-viewer">SumatraPDF</a>: Lightweight, clickable PDF viewer</p>
  </li>
  <li>
    <p><a href="https://imagemagick.org/script/download.php#windows">ImageMagick</a>: Open-source software for editing and manipulating digital images</p>
  </li>
</ul>

<p>Follow the installation directions for each, and as always, be cognizant about what paths you are using to store the files.</p>

<p>Got them? Great.</p>

<h2 id="settings-adjustments">Settings Adjustments</h2>

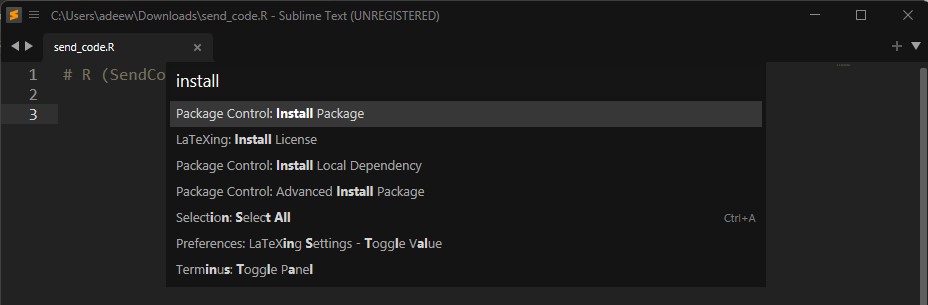
<p>To set up LaTeX within Sublime, we need to ensure that Package Control is successfully installed. With Sublime open, click <kbd>Ctrl</kbd> + <kbd>Shift</kbd> + <kbd>P</kbd>. The dropdown Package Control display should appear, like this:</p>

<p><img src="https://adee-weller.com/assets/images/package_control.jpg" alt="image-center" title="Package Control" class="align-center" /></p>

<p>If it does not appear, try installing Package Control again.</p>

<p>Assuming you’re still on board, let’s change a few of the Package Control settings.</p>

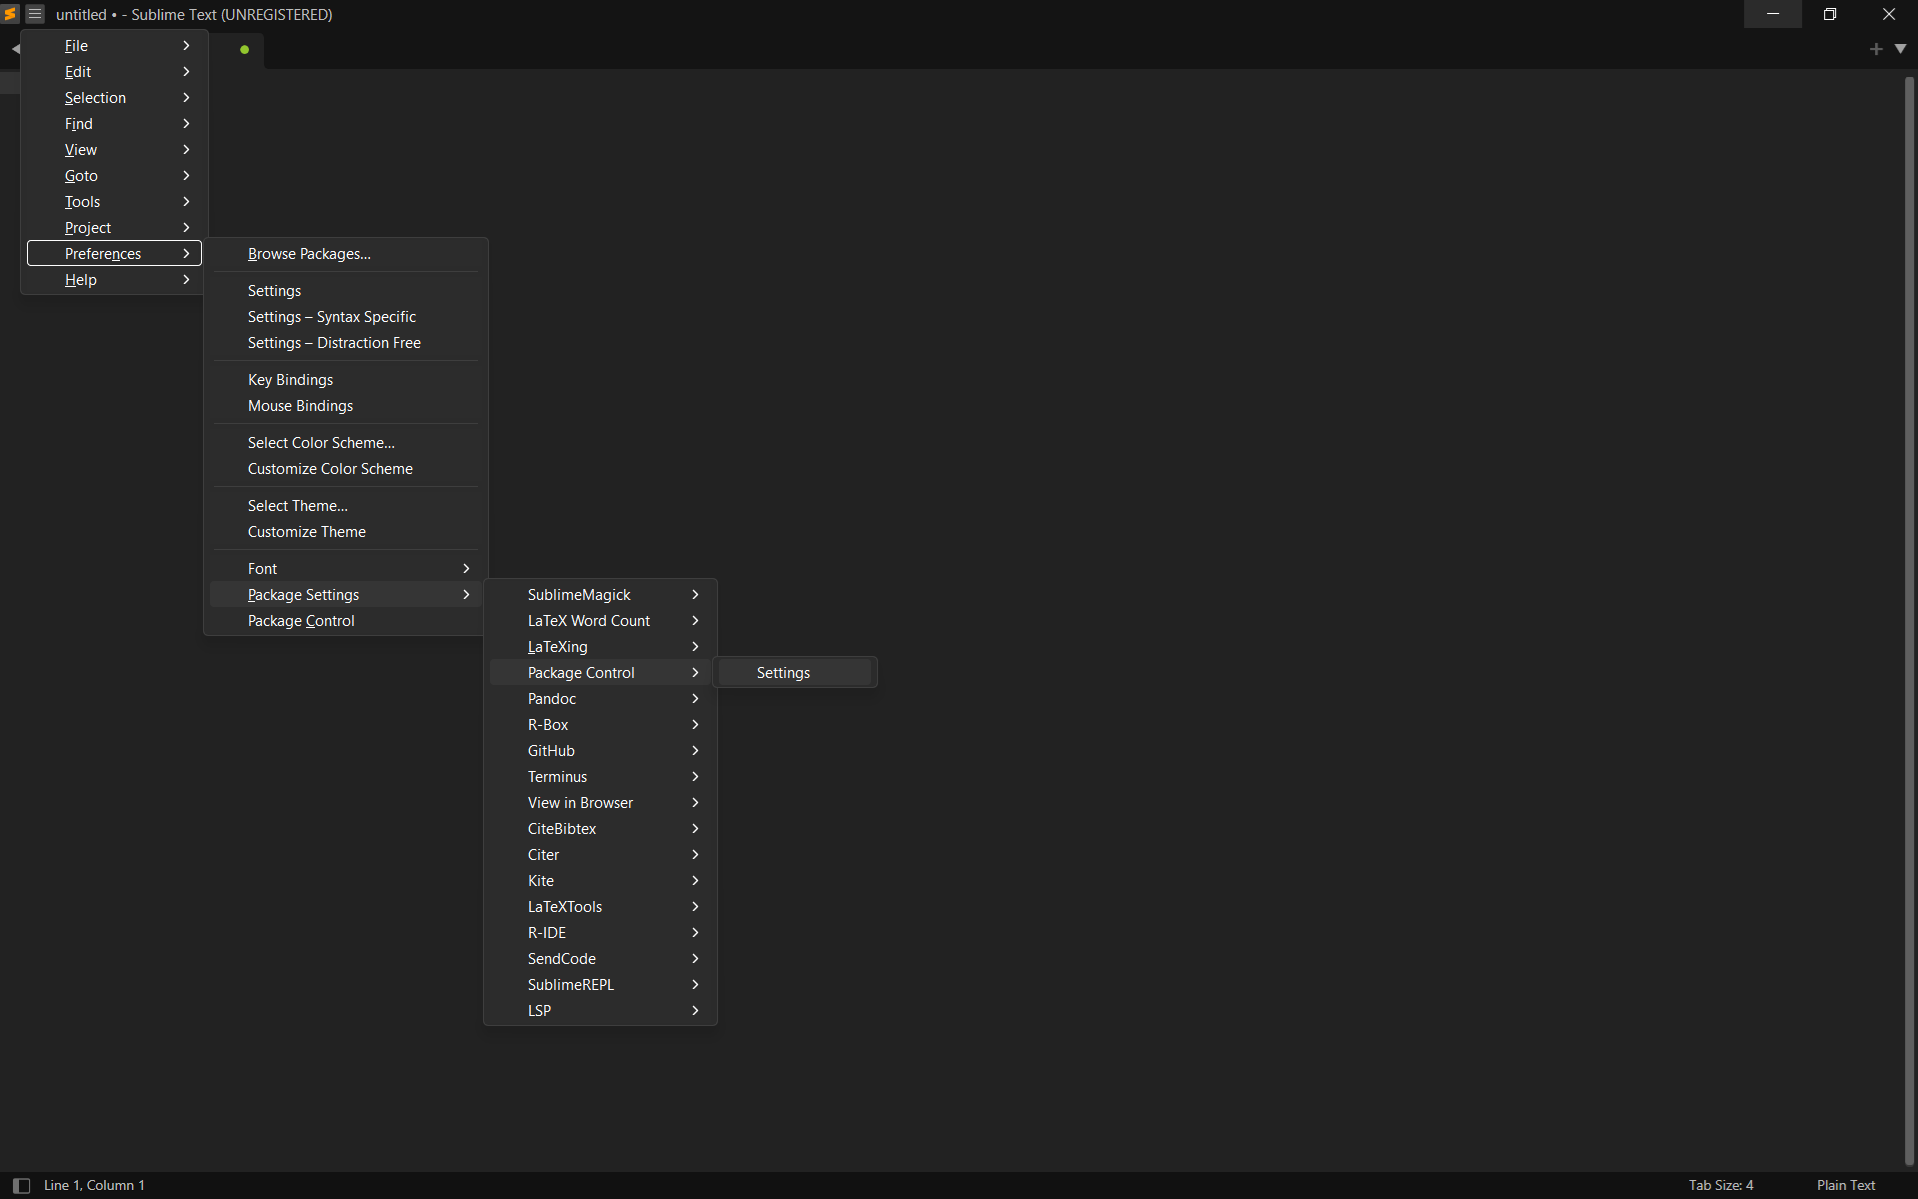
<p>Follow the path to Package Control Settings: <kbd>Preferences</kbd> + <kbd>Package Settings</kbd> + <kbd>Package Control</kbd> + <kbd>Settings</kbd></p>

<p><img src="https://adee-weller.com/assets/images/path_to_pc_sttings.png" alt="image-center" title="Path to Package Control Settings" class="align-center" /></p>

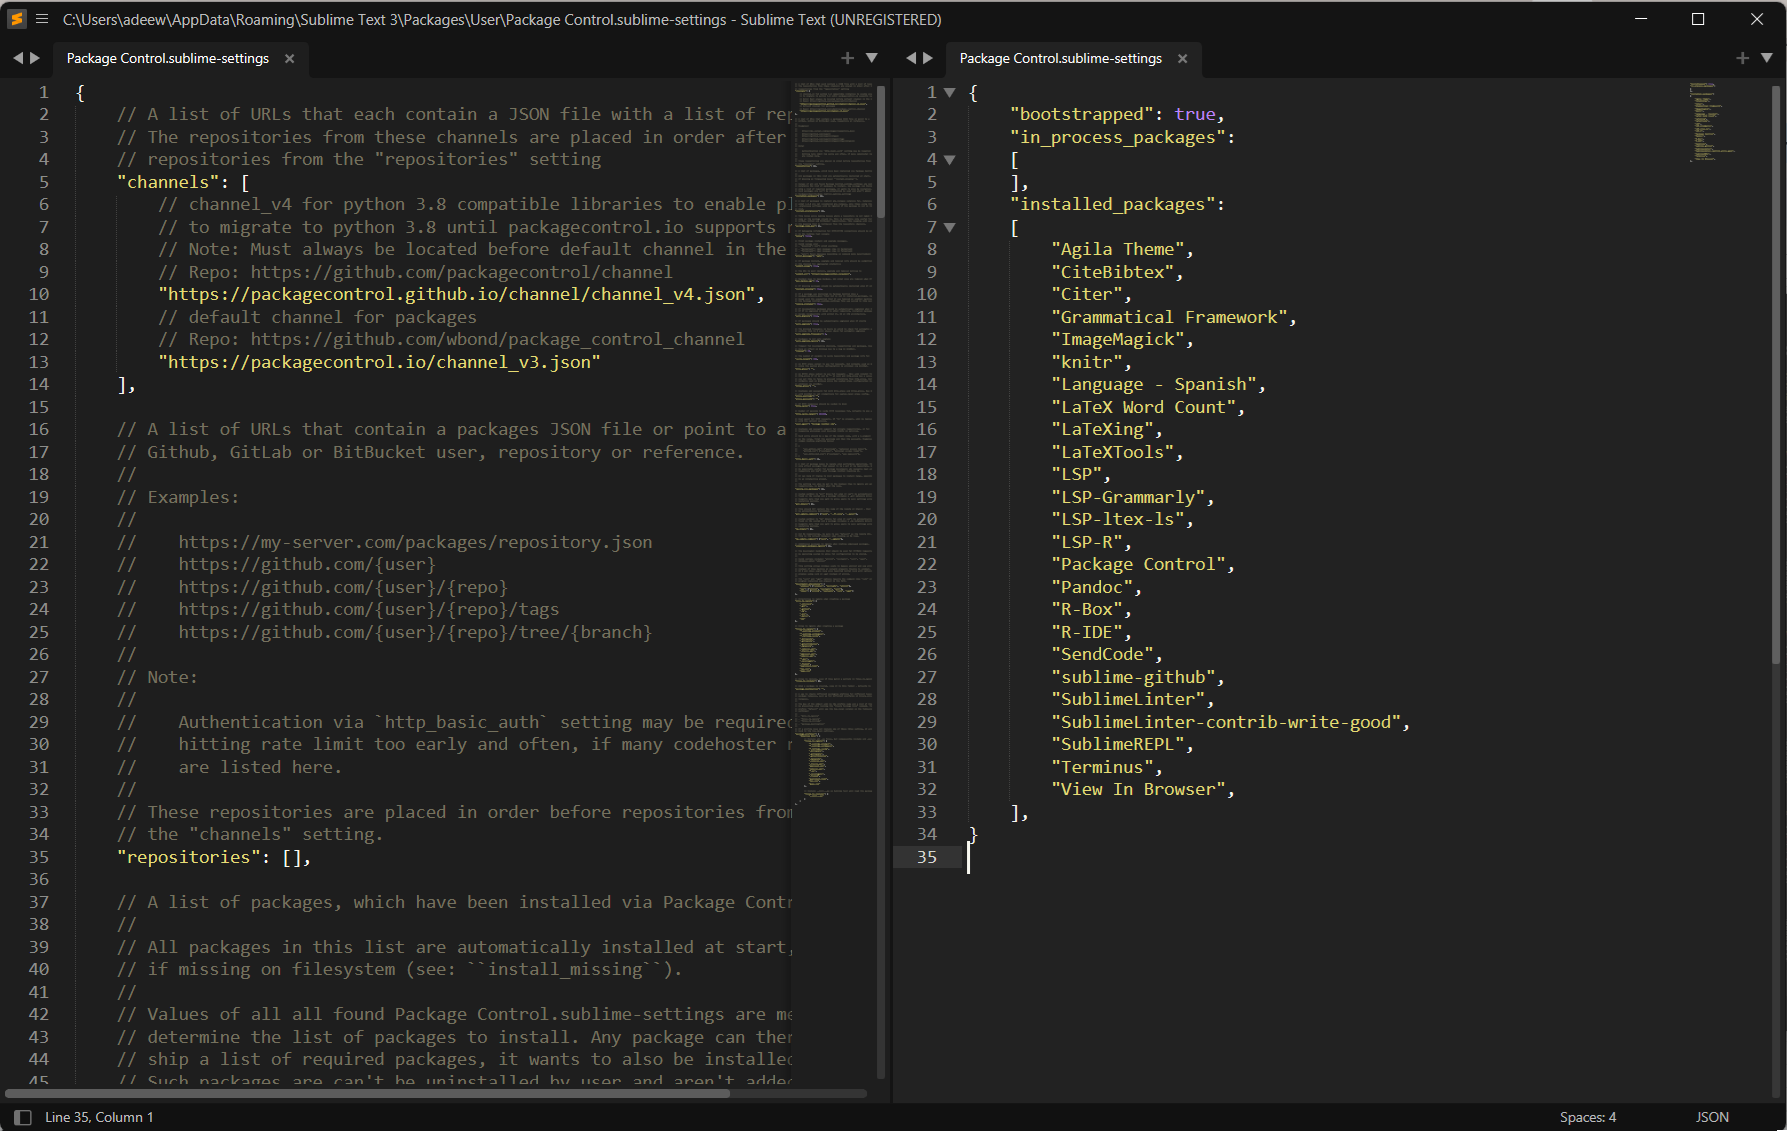
<p>This will open up two panels. The left panel is preset settings, while the right is for user settings. We’ll be using the right one. Copy and add the following code:</p>

<div class="language-json highlighter-rouge"><div class="highlight"><pre class="highlight"><code><span class="w">
</span><span class="p">{</span><span class="w">
	</span><span class="nl">"bootstrapped"</span><span class="p">:</span><span class="w"> </span><span class="kc">true</span><span class="p">,</span><span class="w">
	</span><span class="nl">"in_process_packages"</span><span class="p">:</span><span class="w">
	</span><span class="p">[</span><span class="w">
	</span><span class="p">],</span><span class="w">
	</span><span class="nl">"installed_packages"</span><span class="p">:</span><span class="w">
	</span><span class="p">[</span><span class="w">
		</span><span class="s2">"Agila Theme"</span><span class="p">,</span><span class="w">
		</span><span class="s2">"CiteBibtex"</span><span class="p">,</span><span class="w">
		</span><span class="s2">"Citer"</span><span class="p">,</span><span class="w">
		</span><span class="s2">"Grammatical Framework"</span><span class="p">,</span><span class="w">
		</span><span class="s2">"ImageMagick"</span><span class="p">,</span><span class="w">
		</span><span class="s2">"knitr"</span><span class="p">,</span><span class="w">
		</span><span class="s2">"Language - Spanish"</span><span class="p">,</span><span class="w">
		</span><span class="s2">"LaTeX Word Count"</span><span class="p">,</span><span class="w">
		</span><span class="s2">"LaTeXing"</span><span class="p">,</span><span class="w">
		</span><span class="s2">"LaTeXTools"</span><span class="p">,</span><span class="w">
		</span><span class="s2">"LSP"</span><span class="p">,</span><span class="w">
		</span><span class="s2">"LSP-Grammarly"</span><span class="p">,</span><span class="w">
		</span><span class="s2">"LSP-ltex-ls"</span><span class="p">,</span><span class="w">
		</span><span class="s2">"LSP-R"</span><span class="p">,</span><span class="w">
		</span><span class="s2">"Package Control"</span><span class="p">,</span><span class="w">
		</span><span class="s2">"Pandoc"</span><span class="p">,</span><span class="w">
		</span><span class="s2">"R-Box"</span><span class="p">,</span><span class="w">
		</span><span class="s2">"R-IDE"</span><span class="p">,</span><span class="w">
		</span><span class="s2">"SendCode"</span><span class="p">,</span><span class="w">		
		</span><span class="s2">"sublime-github"</span><span class="p">,</span><span class="w">
		</span><span class="s2">"SublimeLinter"</span><span class="p">,</span><span class="w">
		</span><span class="s2">"SublimeLinter-contrib-write-good"</span><span class="p">,</span><span class="w">
		</span><span class="s2">"SublimeREPL"</span><span class="p">,</span><span class="w">
		</span><span class="s2">"Terminus"</span><span class="p">,</span><span class="w">
		</span><span class="s2">"View In Browser"</span><span class="p">,</span><span class="w">
	</span><span class="p">],</span><span class="w">
</span><span class="p">}</span><span class="w">
</span></code></pre></div></div>

<p>The settings panels should look something like this:</p>

<p><img src="https://adee-weller.com/assets/images/pc_settings2.png" alt="image-center" title="Package Control Settings" class="align-center" /></p>

<p>Depending on what you use, your final packages will undoubtedly look different from mine!</p>

<p>Save and close the settings file. This will initiate Sublime to start downloading and setting up all the packages, and can take up to 15 minutes. Grab a coffee or a snack during this time.</p>

<p>In the meantime, we can adjust some of the other settings. Open Prefence settings by selecting <kbd>Preferences</kbd> + <kbd>Settings</kbd>.</p>

<p>Here you can customize the font size, color scheme, and other pretty factors to your heart’s content.</p>

<p>Once some time has passed, we can check if all the packages have been successfully installed by following: <kbd>Preferences</kbd> + <kbd>Package Settings</kbd> + <kbd>Latex tools </kbd> + <kbd>Check system</kbd>.</p>

<p>Sublime will run through the files and issue any warnings that arise. All programs should say ‘Available’.</p>

<h2 id="opening-a-document">Opening a Document</h2>

<p>To build a PDF, open any .tex file (a LaTeX file) in Sublime. Note that if you have errors in your set up or formatting definition, the PDF may not compile. But as long as everything is working, the PDF should automatically be built upon <kbd>CTRL</kbd> + <kbd>b</kbd> and open in Sumatra.</p>

<p>Here are some other helpful editing tips:</p>

<ul>
  <li>
    <p>On the associated Sumatra PDF, double click anywhere on the page, which will take you to the respective location in Sublime.</p>
  </li>
  <li>
    <p><kbd>CTRL</kbd> + <kbd>r</kbd> in Sublime shows all sections by their headers for easy navigation.</p>
  </li>
  <li>
    <p>To select multiple lines simultaneously, hold down <kbd>CTRL</kbd> as you click.</p>
  </li>
  <li>
    <p>You can save whole LaTeX projects, just like in R, with multiple folders (or carefully keep track of your paths).</p>
  </li>
  <li>
    <p>LaTeX preambles (the bit that formats the document) can be a bit repeatitive. I often copy and paste, adjusting as needed to save time and reduce errors.</p>
  </li>
</ul>

<p>And with that, you are off to the races! Or at least, off to the publishers.</p>

<!-- A notice displays information that explains nearby content. Often used to call attention to a particular detail.

When using Kramdown `{: .notice}` can be added after a sentence to assign the `.notice` to the `<p></p>` element. 

**Changes in Service:** We just updated our [privacy policy](#) here to better service our customers. We recommend reviewing the changes.
{: .notice}

**Primary Notice:** Lorem ipsum dolor sit amet, consectetur adipiscing elit. Integer nec odio. [Praesent libero](#). Sed cursus ante dapibus diam. Sed nisi. Nulla quis sem at nibh elementum imperdiet.
{: .notice--primary}

**Info Notice:** Lorem ipsum dolor sit amet, [consectetur adipiscing elit](#). Integer nec odio. Praesent libero. Sed cursus ante dapibus diam. Sed nisi. Nulla quis sem at nibh elementum imperdiet.
{: .notice--info}

**Warning Notice:** Lorem ipsum dolor sit amet, consectetur adipiscing elit. [Integer nec odio](#). Praesent libero. Sed cursus ante dapibus diam. Sed nisi. Nulla quis sem at nibh elementum imperdiet.
{: .notice--warning}

**Danger Notice:** Lorem ipsum dolor sit amet, [consectetur adipiscing](#) elit. Integer nec odio. Praesent libero. Sed cursus ante dapibus diam. Sed nisi. Nulla quis sem at nibh elementum imperdiet.
{: .notice--danger}

**Success Notice:** Lorem ipsum dolor sit amet, consectetur adipiscing elit. Integer nec odio. Praesent libero. Sed cursus ante dapibus diam. Sed nisi. Nulla quis sem at [nibh elementum](#) imperdiet.
{: .notice--success}

Want to wrap several paragraphs or other elements in a notice? Using Liquid to capture the content and then filter it with `markdownify` is a good way to go.

```html
{% capture notice-2 %}
#### New Site Features

* You can now have cover images on blog pages
* Drafts will now auto-save while writing
{% endcapture %}

<div class="notice">{{ notice-2 | markdownify }}</div>
```


<div class="notice">
  
<h4 id="new-site-features">New Site Features</h4>

<ul>
  <li>You can now have cover images on blog pages</li>
  <li>Drafts will now auto-save while writing</li>
</ul>

</div>

Or you could skip the capture and stick with straight HTML.

```html
<div class="notice">
  <h4>Message</h4>
  <p>A basic message.</p>
</div>
```

<div class="notice">
  <h4>Message</h4>
  <p>A basic message.</p>
</div> -->]]></content><author><name>Adee Weller</name></author><category term="Blog" /><category term="Tutorial" /><category term="text editor" /><category term="setup" /><category term="LaTeX" /><category term="Sublime" /><summary type="html"><![CDATA[Introduction]]></summary></entry><entry><title type="html">About Me</title><link href="https://adee-weller.com/_pages.home.md" rel="alternate" type="text/html" title="About Me" /><published>2022-06-10T00:00:00+00:00</published><updated>2022-06-10T00:00:00+00:00</updated><id>https://adee-weller.com/about-me</id><content type="html" xml:base="https://adee-weller.com/_pages.home.md"><![CDATA[<p>I am a Ph.D. candidate in the <a href="http://polisci.emory.edu/home/index.html">Department of Political Science</a> at <a href="https://www.emory.edu/home/index.html">Emory University</a>. My research delves into the intricate dynamics between violent economic groups – such as organized crime, armed corporations, and mercenary groups – and state actors. I investigate the far-reaching and unexpected consequences of their collusion. My dissertation examines how institutional change shapes violent groups’ relationship to the state, the internal processes by which they make decisions, and the consequences of collusion on democratic accountability.</p>

<p>I have regional experise in Mexico, as well as in Northern Ireland (historical) and Northeastern India (historical).</p>

<p>In my other projects, I examine why states collaborate with certain pro-government militia groups and formalize their influence on electoral outcomes. Methodologically, I adopt a multi-method approach, including deep-learning models (Computer Vision and Natural Language Processing), design-based casual inference, and qualitative analyses.</p>

<p>Prior to joining Emory University, I received my B.A. in <a href="https://politicalscience.unca.edu/">Political Science</a> from the <a href="https://www.unca.edu/">University of North Carolina Asheville</a> in 2020, where I was awarded the <a href="https://uncabulldogs.com/news/2020/5/20/womens-swimming-diving-adee-weller-receives-2020-big-south-christenberry-award.aspx">2020 Big South Christenberry Award</a> and was nominated for <a href="https://www.ncaa.org/news/2020/7/14/ncaa-schools-announce-nominees-for-2020-ncaa-woman-of-the-year.aspx">NCAA Woman of the Year</a>.</p>

<!-- You'll find this post in your `_posts` directory. Go ahead and edit it and re-build the site to see your changes. You can rebuild the site in many different ways, but the most common way is to run `jekyll serve`, which launches a web server and auto-regenerates your site when a file is updated.

To add new posts, simply add a file in the `_posts` directory that follows the convention `YYYY-MM-DD-name-of-post.ext` and includes the necessary front matter. Take a look at the source for this post to get an idea about how it works.

Jekyll also offers powerful support for code snippets:

```ruby
def print_hi(name)
  puts "Hi, #{name}"
end
print_hi('Tom')
#=> prints 'Hi, Tom' to STDOUT.
```

Check out the [Jekyll docs][jekyll-docs] for more info on how to get the most out of Jekyll. File all bugs/feature requests at [Jekyll’s GitHub repo][jekyll-gh]. If you have questions, you can ask them on [Jekyll Talk][jekyll-talk].

[jekyll-docs]: https://jekyllrb.com/docs/home
[jekyll-gh]:   https://github.com/jekyll/jekyll
[jekyll-talk]: https://talk.jekyllrb.com/ -->]]></content><author><name>Adee Weller</name></author><category term="blog" /><category term="about" /><summary type="html"><![CDATA[I am a Ph.D. candidate in the Department of Political Science at Emory University. My research delves into the intricate dynamics between violent economic groups – such as organized crime, armed corporations, and mercenary groups – and state actors. I investigate the far-reaching and unexpected consequences of their collusion. My dissertation examines how institutional change shapes violent groups’ relationship to the state, the internal processes by which they make decisions, and the consequences of collusion on democratic accountability.]]></summary></entry><entry><title type="html">Setting Up Sublime Text with R</title><link href="https://adee-weller.com/_pages.home.md" rel="alternate" type="text/html" title="Setting Up Sublime Text with R" /><published>2022-06-10T00:00:00+00:00</published><updated>2022-06-10T00:00:00+00:00</updated><id>https://adee-weller.com/sublime_setup</id><content type="html" xml:base="https://adee-weller.com/_pages.home.md"><![CDATA[<h2 id="introduction">Introduction</h2>

<p>Are you looking for an easy, fast, and flexible text editor, but aren’t sure where to start? Are you easily distracted and want all your files, programs, and projects in the same place? Do you want a editor than can handle a wide array of languages, programs, and platorms? If the answer to any of these questions is yes, then Sublime Text Editor is may be a great fit for you.</p>

<p>I first started using Sublime as a Political Science major in undergrad – and I had no clue what I was doing. Like many others, I had no experience with any sort of coding, and just thinking about mysterious lines on a screen made my head spin. And I wasn’t using it for python yet, only R and LaTeX. But within a short period of time, I was up and running.</p>

<p>In this post, let us walk through what Sublime is, why may be the right fit for you, and how to get it set up with R. In future posts, we will work through how to set it up with LaTeX, python, markdown, and much more!</p>

<p>But before we continue, I assume in this tutorial that you already have R dowloaded on your computers. If you have not, please <a href="https://cloud.r-project.org/">do so here.</a> For more information on R, check out their <a href="https://www.r-project.org/about.html">introduction here.</a></p>

<h2 id="what-is-sublime">What is Sublime?</h2>

<p>Sublime is a text editor. To be more specific, Sublime is a sophisticated, cross-platform source code editor. It supports a variety of programming and markup languages, and features an array of plugins, which are typically community-built and maintained under free-software licenses. You can think about Sublime as the swiss-army knife of text editing. The plugin ecosystem and its extensability make Sublime a worthy choice. It’s incredibly fast and lightweight. An annual subscription costs $99 USD, but note that the free trial period is unlimited.</p>

<p>While downloading Sublime is easy, setting it up to work with R, LaTeX, and other platforms is often less intuitive. But don’t be intimidated – it can be quite easy and straight forward. In the following sections, we will walk through setting up Sublime and installing the appropriate plugins. Note too, that for this tutorial, I will be demonstrating the examples for Windows, but I will provide additional information for Mac and Linux when possible.</p>

<h2 id="setting-up-sublime">Setting up Sublime</h2>

<p>To download Sublime, <a href="https://www.sublimetext.com/">follow this link to the Sublime webpage</a>. Download the appropriate <strong>.exe</strong> file for your computer from the home page. Go ahead and run the executable file through the Setup Wizard that appears. If you want to save the program in a non-default location, this is when you can do it. Otherwise, you can keep hitting next and finally, install.</p>

<p>That’s it! You’ve successfully installed Sublime. Remember, if you are using the free unlimited trial, you may occasionally get a dialogue box prompting you to purchase a license, but if you wish to continue your trial, you can simply exit out of the box.</p>

<p>For the rest of this tutorial, we will be using the extension management system called ‘<strong>Package Control</strong>.’ This is used to install extensions, themes, and color schemes. Since Sublime does not come with Package Control, we will need to install it. To install anything, we need to first open the ‘<strong>Command Palette</strong>’. The shortcut for this is <kbd>Ctrl</kbd> + <kbd>Shift</kbd> + <kbd>P</kbd> (<kbd>Command</kbd> + <kbd>Shift</kbd> + <kbd>P</kbd> on Mac), although you can also open it from the Preferences tab. Using the shortcut, a toolbar will drop down from the top, and search ‘install.’ The first option should be `Install Package Control.’ Select it and hit <kbd>Enter<kbd>. It may take a minute.</kbd></kbd></p>

<p>After it is installed, I would recommend closing Sublime and re-opening it before we move to the next steps.</p>

<h2 id="setting-up-r-with-sublime">Setting up R with Sublime</h2>

<p>Sublime can be an nice alternative to RStudio, especially when writing multi-format articles or working in both R and LaTeX simultaneously. While the visualizations may not be as immediately accessible (for instance, there is no variable viewer in the corner of the screen, like there is in RStudio), it can also be less distracting. Further, all the data remains easily accessible, and when simulateously writing in LaTeX, everything is in the same application. Again, for someone with a short attention span, the less distractions the better.</p>

<p>Let’s start with a blank .R file in Sublime. Open a file and save it as “file.R” – this let’s Sublime know you are working on an R file and it will automate some of the commands.</p>

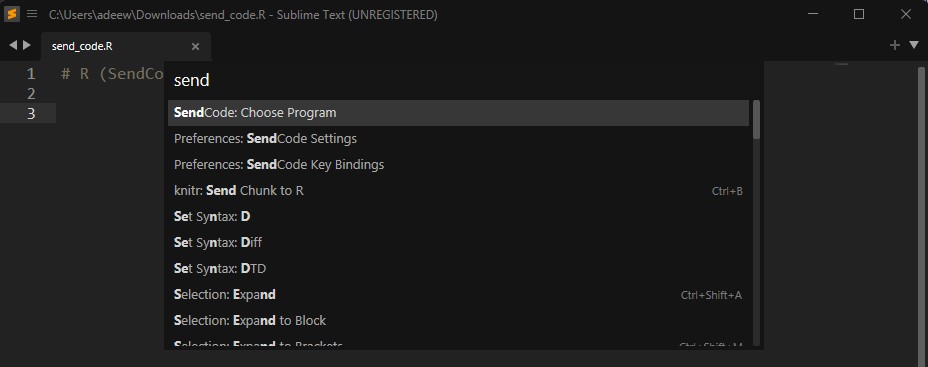
<p>To set up R within Sublime, we need to install the appropriate packages. Again, open the Command Package and search ‘install.’ Now, ‘<strong>Package Control: Install Package</strong>’ should be the first option. Select it and hit enter. This may take a moment.</p>

<p><img src="https://adee-weller.com/assets/images/install_package_control2.jpg" alt="image-center" title="Installing Packages" class="align-center" /></p>

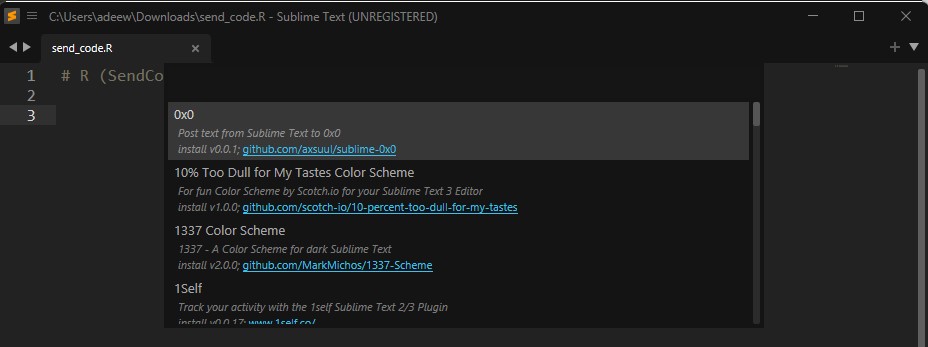
<p>From there, all the available repositories will be available to be chosen.</p>

<p><img src="https://adee-weller.com/assets/images/package_control.jpg" alt="image-center" title="Package Control" class="align-center" /></p>

<p>Now, we need to install the following packages:</p>

<ul>
  <li><em>‘sublime-ide-r’</em>
    <ul>
      <li>A package maintained by randy3k that transforms Sublime into R-Studio with some cool features added (formerly R-IDE).</li>
    </ul>
  </li>
  <li><em>‘SendCode’</em>
    <ul>
      <li>This sends code from the text editor to be run in either the terminal or in the R user interface (RGui).</li>
    </ul>
  </li>
</ul>

<p>(As a note, you can set this part up a couple different ways. You can send the code directly to the R GUI, send it to a terminal, or some other shell. To do that, use the package <em>‘Terminus’</em> and set that up instead. In this tutorial, we will be sending it to R’s interface. However, know that there are options out there and pick the one that is best for you.)</p>

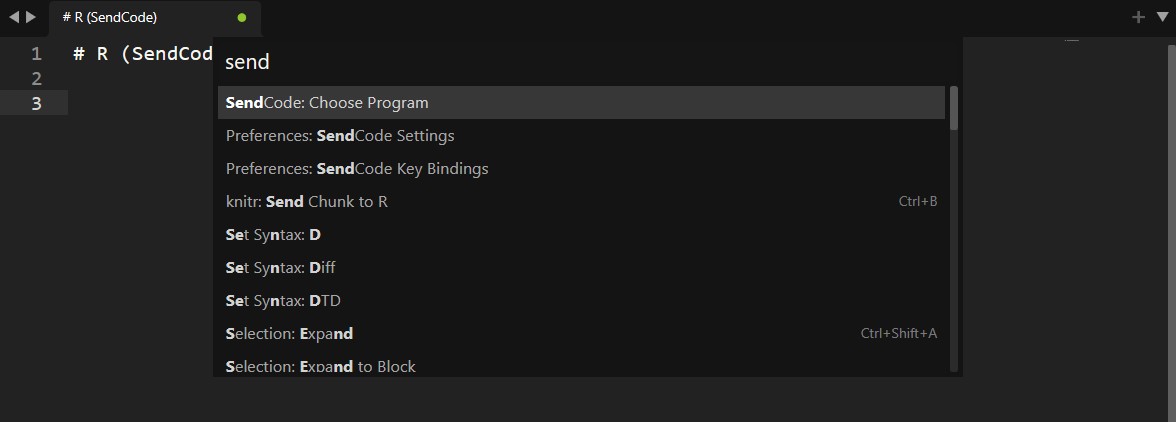
<p><img src="https://adee-weller.com/assets/images/install_sendcode.jpg" alt="image-center" title="Installing SendCode" class="align-center" /></p>

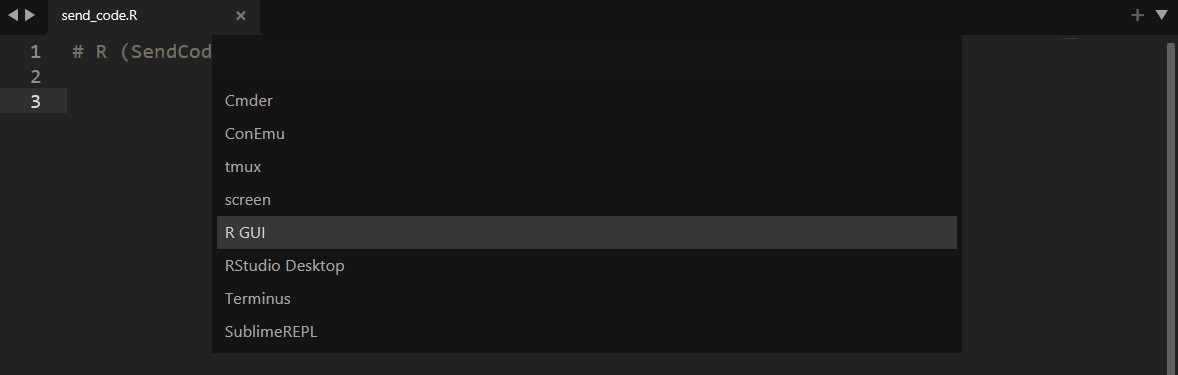
<p>Once those two are installed, open Package Control back up and select the option that says ‘<em>SendCode: Choose Program</em>’ and hit enter. Sublime will open a list of all the consoles where the code can be sent.</p>

<p><img src="https://adee-weller.com/assets/images/sendcode1.jpg" alt="image-center" title="Send Code Program Selection (1)" class="align-center" /></p>

<p>From there, you can select the program that you want to send the R script to – choose R GUI. You can also use RStudio if you refer, but this page is set up for the R base.</p>

<p><img src="https://adee-weller.com/assets/images/sendcode2.jpg" alt="image-center" title="Send Code Program Selection (2)" class="align-center" /></p>

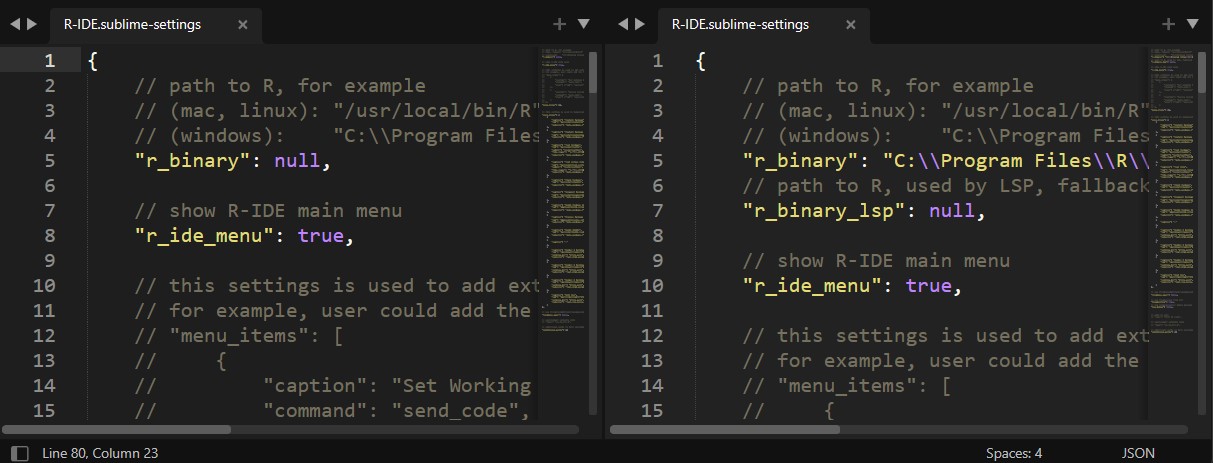
<p>The next step is to let Sublime know where the R GUI is located. To make the appropriate path to R, go to ‘Preferences’ then ‘Package Settings’ at the bottom of the drop-down tab. From there, we can access all the settings for our downloaded packages. Find the one for R-IDE and open Settings.</p>

<p>Next, we will define the path for Sublime to access R. Hover over <em>Preferences</em> to <em>Package Settings</em> to <em>sublime-ide-r</em> to open the user settings.</p>

<p><img src="https://adee-weller.com/assets/images/ide_r_settings1.jpg" alt="image-center" title="Opening R-IDE Settings" class="align-center" /></p>

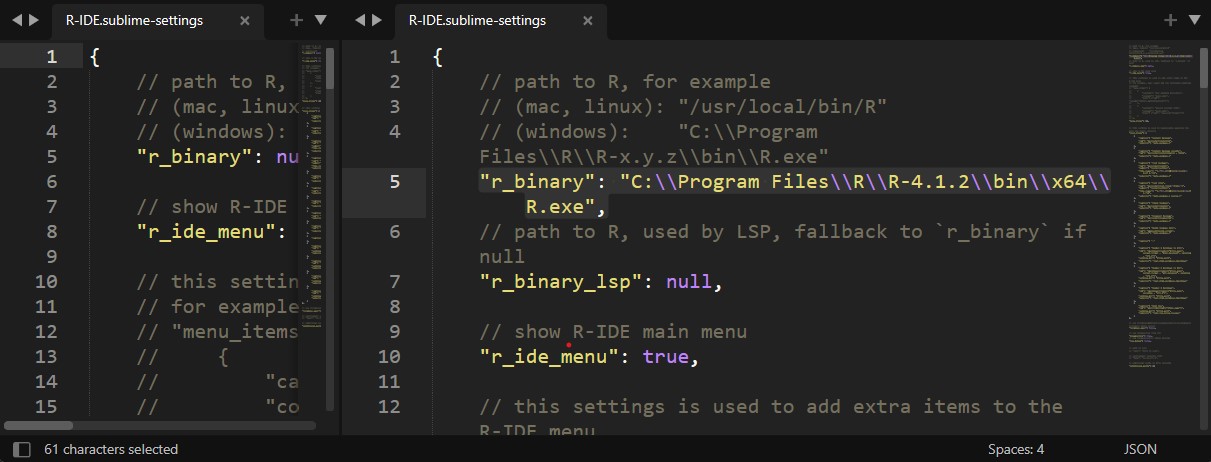
<p>You won’t need to edit settings on the left – these are the universal settings. We will focus on the panel on the right, where user settings are located. Edit the path to R to match the path to the .exe file in R. See the highlighted text below. This path must match exactly. Once this is changed, you can save the settings and exit them out.</p>

<p><img src="https://adee-weller.com/assets/images/ide_r_settings2.jpg" alt="image-center" title="Opening R-IDE Settings" class="align-center" /></p>

<p>Now you should be set up! Open the R GUI on one panel and your R script in Sublime on another. To run a line of code that you have written in Sublime in R, simply select it and hit <kbd>Ctrl</kbd> + <kbd>Enter</kbd>. The line and output should appear on the screen in the R GUI. Run whole files with ease!</p>

<p>Finally, this process only ever needs to be repeated once. Now you are ready to start maintaining, cleaning, analysing, and visualizing your data!</p>

<!-- A notice displays information that explains nearby content. Often used to call attention to a particular detail.

When using Kramdown `{: .notice}` can be added after a sentence to assign the `.notice` to the `<p></p>` element. 

**Changes in Service:** We just updated our [privacy policy](#) here to better service our customers. We recommend reviewing the changes.
{: .notice}

**Primary Notice:** Lorem ipsum dolor sit amet, consectetur adipiscing elit. Integer nec odio. [Praesent libero](#). Sed cursus ante dapibus diam. Sed nisi. Nulla quis sem at nibh elementum imperdiet.
{: .notice--primary}

**Info Notice:** Lorem ipsum dolor sit amet, [consectetur adipiscing elit](#). Integer nec odio. Praesent libero. Sed cursus ante dapibus diam. Sed nisi. Nulla quis sem at nibh elementum imperdiet.
{: .notice--info}

**Warning Notice:** Lorem ipsum dolor sit amet, consectetur adipiscing elit. [Integer nec odio](#). Praesent libero. Sed cursus ante dapibus diam. Sed nisi. Nulla quis sem at nibh elementum imperdiet.
{: .notice--warning}

**Danger Notice:** Lorem ipsum dolor sit amet, [consectetur adipiscing](#) elit. Integer nec odio. Praesent libero. Sed cursus ante dapibus diam. Sed nisi. Nulla quis sem at nibh elementum imperdiet.
{: .notice--danger}

**Success Notice:** Lorem ipsum dolor sit amet, consectetur adipiscing elit. Integer nec odio. Praesent libero. Sed cursus ante dapibus diam. Sed nisi. Nulla quis sem at [nibh elementum](#) imperdiet.
{: .notice--success}

Want to wrap several paragraphs or other elements in a notice? Using Liquid to capture the content and then filter it with `markdownify` is a good way to go.

```html
{% capture notice-2 %}
#### New Site Features

* You can now have cover images on blog pages
* Drafts will now auto-save while writing
{% endcapture %}

<div class="notice">{{ notice-2 | markdownify }}</div>
```


<div class="notice">
  
<h4 id="new-site-features">New Site Features</h4>

<ul>
  <li>You can now have cover images on blog pages</li>
  <li>Drafts will now auto-save while writing</li>
</ul>

</div>

Or you could skip the capture and stick with straight HTML.

```html
<div class="notice">
  <h4>Message</h4>
  <p>A basic message.</p>
</div>
```

<div class="notice">
  <h4>Message</h4>
  <p>A basic message.</p>
</div> -->]]></content><author><name>Adee Weller</name></author><category term="Blog" /><category term="Tutorial" /><category term="text editor" /><category term="setup" /><category term="R" /><category term="Sublime" /><summary type="html"><![CDATA[Introduction]]></summary></entry></feed>